DIFFERENCES IN NETWORK
CABLE UTP STRAIGHT AND CROSS

UTP cable transmission medium is one of
the most widely used to create a local network (Local Area Network), but
because the price is relatively cheap, easy to install and quite reliable. As
the name implies Unshielded Twisted Pair means twisted pair cable / twisted
(twisted pair) without protective (unshielded). This convolution function is as
elimination of the induction and leakage. Previously there was also cable STP
(Shielded Twisted Pair), for example the picture can be seen below:
To distinguish and STRAIGHT CROSS cable is to look at the color arrangement of pins on the connectors RG 45 which consists of 8 different colors. I'll explain how to prepare the most common colors used for cable termination Straight and Cross (Standard International). 8 colors normally used are Orange (O), White Orange (PO), Blue (B), White Blue (PB), Green (H), White Green (PH), Brown (C), White Chocolate (PC). for some kind of specific quality cables typically only use a single color for all the pins, you must be extra careful to conduct this type of cable termination.
1. Cable STRAIGHT
Straight cable is a cable that uses the term to the same standard at both ends of the cord, can EIA / TIA 568A or EIA / TIA 568B on both ends of the cable. Simply put, the color sequence on both ends of the same cable. In the straight cable, pin 1 on one end of the cable connects to pin 1 at the other end, pin 2 connected to pin 2 at the other end, and so on.
To perform a straight cable terminations usually several ways to apply the twin side which likens the arrangement between the two ends of the connector without regard to the arrangement of colors used.
we use here is the arrangement of colors according to international standards, why do I say international standards, because in the basic curriculum standards are applied cisco academy is sure to be used and as a basic knowledge for a network technician or engineer one spot is absolutely understandable.

As for the
function of each
pin can be seen in
the picture below;

The
use of a straight cable is as follows:
1. Connect the computer to the switch
2. Connect the computer to the LAN on the cable modem / DSL
3. Connect the router to the LAN on the cable modem / DSL
4. Connect the switch to the router
5. Connect the hub to the router
1. Connect the computer to the switch
2. Connect the computer to the LAN on the cable modem / DSL
3. Connect the router to the LAN on the cable modem / DSL
4. Connect the switch to the router
5. Connect the hub to the router
Practice Makes Straight Cable
1. Peel the end of the UTP cable, approximately 2 cm
2. Open spiral cable, align and sequence wiring standards TIA / EIA 368B
3. After the order according to the standard, cut and flatten the ends of the cable,
4. Put the cable is straight and parallel into the RJ-45 connector, and make sure all the wiring position is correct.
5. Perform crimping using a crimping tool, press the crimping tool and make sure all the pins (brass) on the RJ-45 has "bite" each cable.
6. Once completed at the end of that one, do it again on the other end
7. The final step is pulled-check the cable that you created earlier by using the LAN tester, how inputs each end of the cable (RJ-45) to masing2 an available port on the LAN tester, turn it on and make sure all the LED lights up in accordance with cable order we make.
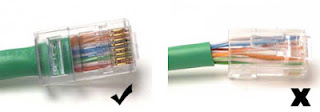
8. Below is an example of the end of the UTP cable that has an RJ-45 connector is installed properly, the cable sheath (blue) come into the connector, cable order from left to right (in the figure below pin cable sequence starting from top to bottom) ,
2. Cable CROSS
CROSS cable is a cable that has a different color sequences at both ends of the connector, any arrangement that distinguishes her? from the arrangement of the colors that you have you just swap the stacking order of pin / color at one end of the connector that you plug in which the sequence of colors that are exchanged with the sequence 1 to 3 and the sequence of colors to 2 with the 6th. (1.3) (2.6), then its results as follows:

As for the
function of each
pin can be seen in
the picture below

If the termination of the CROSS cable
you are not using prescribed standards or because the cable that you use only
has one color for each pin, you must remember is the sequence.
A crossover cable using the EIA / TIA 568A at one end of the cord and EIA / TIA 568B at the other end of the cable.
A crossover cable using the EIA / TIA 568A at one end of the cord and EIA / TIA 568B at the other end of the cable.
use
a cross-over cable is as follows:
1. Connect the two computers directly
2. Connect 2 pieces switch
3. Connect the two pieces of the hub
4. Connect the switch with a hub
5. Connect your computer to the router
8 pieces of existing wires in the UTP cable (either on a straight or cross-over cable) only four pieces are used to send and receive data, ie no cables on pins 1,2,3 and 6.
Practice Makes Cable Cross
Creating a cross cable has a similar step with a straight cable, the difference lies only in the order of the colors of both ends of the cable. Unlike the straight cable that has the same color sequence on both ends of the cable, the cable cross has a different color sequences at both ends of the cable.
Cable end 1 - 2 cable end
White Orange - White Green
Orange - Green
White Green - White Orange
Blue - blue
White Blue - White Blue
Green - Orange
White Brown - White Brown
Brown - Brown
Below is an example of the end of the UTP cable that has an RJ-45 connector is installed properly, the cable sheaths come into the connector.
When one of the sheathing does not go into the connector.
Examples
of the picture as follows:

And the
last step we have to do is check the cable that
you created earlier by using the tool
LAN Tester, how
inputs each end
of the cable (RJ-45) to each port available on LAN Tester,
turn it on and make sure all the lights LED lights
up in accordance with the cable
sequence that we make. If no lights are
not lit LED means
that there is an error during a
crimping with crimping
pliers.
Creating Straight and Cross Over Cable
To create a wired network using UTP cable, there are some tools that we need to prepare, the UTP cable, RJ-45 Connector, crimping tools and RJ-45 LAN Tester, sample picture as below:
Creating Straight and Cross Over Cable
To create a wired network using UTP cable, there are some tools that we need to prepare, the UTP cable, RJ-45 Connector, crimping tools and RJ-45 LAN Tester, sample picture as below:

Techniques
Installing LAN Cables / UTP Type Straight and Cross
Techniques Cabling LAN or UTP is an important
key for those who want to make a good network of Small Scale (PC to PC) or the
scale of the (PC to HUB) because of technical means connecting cable into a
jack specific connection to the LAN (Jack RJ-45) that carelessly will not work
or will not connect as they should.
Either directly, yes I discuss about how
to install the UTP cable types and cross straight. Let ga extension article.
You'll even lazy to read.
Before you practice, there are some
hardware that you need to prepare, including:
1. Cable
UTP (Unshielded Twisted Pair). UTP cabling commonly used is the category of 5
UTP cable (UTP Cat 5). Why? Because Cat-5 UTP cable supports data transfer up
to 100 Mbps. This cable consists of 8 small that have different colors. The
cable color is Orange, Orange White, Blue, Blue White, Green, Green White,
Brown and White.
2. The
second is Jack RJ-45. Jack is similar to home phone jack. Only the larger size.
Jack RJ-45 consists of an 8-pin, according to the amount of UTP cable.
3. Crimping
Tools or crimping pliers. Hardware that is similar to the one tang. However,
its function is not as pliers in general. Crimping tool is useful for cable
clip on Jack RJ-45.
How to overcome :
Check back
Writing ON syntax Destination IP ping
Check
whether the installation of cables Already Back Right Computer destination
Check Back IN purpose computer
Turn off
your computer's firewall in both ( How to Turn off the Firewall )
Destination unreachable , occur when the host , network , port or protocol
certain can not be reached . This is because:
1. The network cable , USB Wireless LAN Card or may not be connected to a PC or the device damaged
2. HUB / SWITCH not turn on or damaged
3. Status " Local Area Connection " still "Disable " on the Network Connection
Control Panel .
The solution :
Problem 1 : connect network devices are properly in place , if
defective devices it needs to change positions for LAN PCI Card into the slot
The new ( if it has no impact at all then replace it with a new ) ,
If the device is a Wireless USB , then make sure the indicator lamp lights up
and try to move to another USB port ( if not the same impact
once then replace it with a new device ) .
Problem 2 : Turn HU / SWITCH and try to move to the target computer network cable
another slot , then try the connection test again.If no change
after a check by solving problems 1 then can be sure
HUB / SWITCH is broken , so it must be repaired or replaced with new ones .
Problem 3 : Right click on the Local Area Connection which disable the gray color and then click enable and try to test the connection again .
SHARING DATA
The purpose of this technique is to share access to another user to a folder you want. You can choose to users anywhere who can or can access your folders and can also provide access to everyone on the network or your network.
Advantages Data Sharing
- Reduce the cost of duplication of data collection efforts
- Safe-keeping data in a secure environment
- Back-up data
Weakness Data Sharing
Ease of sharing files in a network that is intended to be used by certain people, often resulting in the leaking of sharing folders and can be read also by others who are not entitled. This will always happen if it is not set by the network administrator.
While one of the bases of data sharing is beneficial, archiving dataset through a dedicated organization is better.
The data center has a centralized infrastructure and in-house expertise in all aspects of data ingest, coration, preparation, documentation, storage, deployment, user support and promotion. •
Step-by-step data sharing
In the sharing of data, there are some things that need to be provided include:
1. Provide 2 or more computers
2. Provide cable types CROSSOVER / STRAIGHT
3. Switch
4. Make sure all perfect .
Now living sharing
1. Turn on all devices (make sure everything is on )
2. Plug the cable crossover / straight to the computer and switch
After that stay settings on the next system
1. Click star
2. Control panel
3. Network connection
4. LAN
5. Right click on the LAN
6. Property
7. Setting TCP / IP